The Missing Piece: Your Shaders Can See
There's a secret power in SwiftUI's shader system that we have sprinkled in previous examples: layerEffect. This single capability transforms shaders from pixel painters into image processors that can sample, analyze, and transform existing content.
Here's what changes everything: When you use layerEffect, your shader receives a texture - a complete image of the view it's applied to. Suddenly, you can blur, distort, analyze neighboring pixels, create convolution filters, and build effects that were impossible with colorEffect.
But here's the harsh reality: Most developers use layerEffect like colorEffect with extra steps. They sample a pixel and modify it. That's like using a Ferrari to deliver pizza. Master the true power of texture sampling, and you'll create effects that rival professional image editing software.
Mathematical Foundation: What Is a Texture?
A texture isn't just an image. It's a function that maps coordinates to colors:
texture: (u, v) → (r, g, b, a)
But here's the beautiful part: You're not limited to sampling at integer coordinates. You can sample between pixels, combine multiple samples, and even sample outside the texture bounds.
The Sampling Function
// Basic sampling
half4 color = layer.sample(position);

// But the real signature is more like:
// sample(float2 position, sampler s = defaultSampler)
The sampler controls:
- Filtering: How colors blend between pixels (linear vs nearest)
- Addressing: What happens outside bounds (clamp, repeat, mirror)
- Mipmapping: Level-of-detail for different scales
The Four Fundamental Texture Operations
1. Convolution: The Foundation of Filters
Convolution is applying a kernel (small matrix) across an image. Think of it as a sliding window that combines neighboring pixels using weights to create effects like blur, sharpen, or edge detection.
How it works: For each pixel, multiply its neighbors by kernel values, then sum the results:
Original pixels:        Kernel:           Result:
[40][80][120]         [-1][0][1]
[50][90][130]    ×    [-2][0][2]    =   One new pixel value
[60][100][140]        [-1][0][1]
Imagine the kernel as a "recipe" for mixing pixels:
- Blur kernel: Mix all neighbors equally → smooth result
- Sharpen kernel: Emphasize center, subtract neighbors → enhanced edges
- Edge detection: Find differences between neighbors → highlights boundaries
3x3 Convolution Filter
Interactive convolution filter with predefined kernels and visual matrix editor
Gaussian blur - smooths the image by averaging nearby pixels
Common kernels:
// Edge detection (Sobel X)
float sobelX[9] = {
    -1, 0, 1,
    -2, 0, 2,
    -1, 0, 1
};

// Gaussian blur
float gaussian[9] = {
    1/16.0, 2/16.0, 1/16.0,
    2/16.0, 4/16.0, 2/16.0,
    1/16.0, 2/16.0, 1/16.0
};

// Sharpen
float sharpen[9] = {
     0, -1,  0,
    -1,  5, -1,
     0, -1,  0
};
Why kernel values matter:
- Sum = 1.0: Preserves image brightness (blur, most filters)
- Sum > 1.0: Brightens image (sharpen often has sum > 1)
- Sum = 0.0: Extracts features only (edge detection)
- Negative values: Create inverse/subtract effects
2. Separable Filters: The Performance Secret
Many 2D filters can be separated into two 1D passes:
Separable Gaussian Blur
Efficient blur implementation using separable filters - demonstrates the power of optimized texture sampling
// Instead of 9 samples for 3x3 blur...
// Do 3 samples horizontal, then 3 samples vertical = 6 total!

[[ stitchable ]] half4 gaussianBlurHorizontal(
  float2 position,
  SwiftUI::Layer layer,
  float2 size,
  float radius
) {
  float2 texelSize = float2(1.0 / size.x, 0.0);
  half4 result = half4(0.0);
  float weightSum = 0.0;

  // Gaussian weights
  int samples = int(radius * 3.0);
  for (int i = -samples; i <= samples; i++) {
      float weight = exp(-float(i * i) / (2.0 * radius * radius));
      result += layer.sample(position + float(i) * texelSize * size) * weight;
      weightSum += weight;
  }

  return result / weightSum;
}

[[ stitchable ]] half4 gaussianBlurVertical(
  float2 position,
  SwiftUI::Layer layer,
  float2 size,
  float radius
) {
  float2 texelSize = float2(0.0, 1.0 / size.y);
  // Same as horizontal but for Y axis
}3. Non-Linear Filters: Beyond Convolution
Not all filters are linear. Some of the most powerful effects come from non-linear operations:
Oil Painting Effect
Non-linear filter that creates painterly effects by finding dominant colors in local neighborhoods
[[ stitchable ]] half4 oilPainting(
  float2 position,
  SwiftUI::Layer layer,
  float2 size,
  float radius,
  float levels
) {
  float2 texelSize = 1.0 / size;

  // Discretize the color space
  int levelCount = int(levels);
  float levelSize = 1.0 / levels;

  // Histogram for each discretized color level
  float histogram[8];  // Simplified - would be dynamic
  half3 colorSum[8];

  // Initialize
  for (int i = 0; i < levelCount; i++) {
      histogram[i] = 0.0;
      colorSum[i] = half3(0.0);
  }

  // Sample neighborhood
  int radiusInt = int(radius);
  for (int y = -radiusInt; y <= radiusInt; y++) {
      for (int x = -radiusInt; x <= radiusInt; x++) {
          float2 offset = float2(x, y) * texelSize;
          half4 sample = layer.sample(position + offset * size);

          // Discretize intensity
          float intensity = dot(sample.rgb, half3(0.299, 0.587, 0.114));
          int level = int(intensity * levels);
          level = clamp(level, 0, levelCount - 1);

          // Add to histogram
          histogram[level] += 1.0;
          colorSum[level] += sample.rgb;
      }
  }

  // Find dominant intensity level
  int maxLevel = 0;
  float maxCount = 0.0;
  for (int i = 0; i < levelCount; i++) {
      if (histogram[i] > maxCount) {
          maxCount = histogram[i];
          maxLevel = i;
      }
  }

  // Return average color of dominant level
  half3 finalColor = colorSum[maxLevel] / histogram[maxLevel];
  return half4(finalColor, layer.sample(position).a);
}4. Distortion Effects: Sampling With Purpose
The power of texture sampling shines when you sample from calculated positions:
Chromatic Distortion
Combines spatial distortion with chromatic aberration for dramatic visual effects
[[ stitchable ]] half4 chromaticDistortion(
  float2 position,
  SwiftUI::Layer layer,
  float2 size,
  float time,
  float distortionAmount
) {
  float2 uv = position / size;

  // Create distortion pattern
  float2 distortion = float2(
      sin(uv.y * 20.0 + time * 2.0),
      cos(uv.x * 20.0 - time * 1.5)
  ) * distortionAmount;

  // Sample from distorted position
  float2 distortedPos = position + distortion * 20.0;

  // Add chromatic aberration
  half4 r = layer.sample(distortedPos + float2(2.0, 0.0));
  half4 g = layer.sample(distortedPos);
  half4 b = layer.sample(distortedPos - float2(2.0, 0.0));

  return half4(r.r, g.g, b.b, g.a);
}Importance Sampling: Smart Blur
Instead of sampling uniformly, sample based on importance. This filter selectively blurs only similar colors while preserving edges and details. Unlike regular blur that averages all nearby pixels, it:
- Checks color similarity - Only includes pixels within the threshold color distance
- Preserves edges - Different colors (like object boundaries) stay sharp
- Weighted averaging - Closer pixels have more influence via exponential falloff
The "smart" part is the if (colorDiff < threshold) check. This makes it perfect for:
- Reducing noise while keeping edges crisp
- Smoothing skin in portraits without blurring features
- Cleaning up compression artifacts
Think of it as a blur that "respects boundaries" - it won't mix the blue sky into the green trees, but it will smooth out variations within the sky itself.
Smart Blur (Edge-Preserving)
Intelligent blur that preserves edges while smoothing similar colors - perfect for noise reduction
[[ stitchable ]] half4 smartBlur(
  float2 position,
  SwiftUI::Layer layer,
  float2 size,
  float radius,
  float threshold
) {
  half4 center = layer.sample(position);
  half4 result = center;
  float totalWeight = 1.0;

  int samples = int(radius);
  for (int y = -samples; y <= samples; y++) {
      for (int x = -samples; x <= samples; x++) {
          if (x == 0 && y == 0) continue;

          float2 offset = float2(x, y);
          float dist = length(offset);
          if (dist > radius) continue;

          half4 sample = layer.sample(position + offset);

          // Compare similarity
          float colorDiff = length(sample.rgb - center.rgb);

          // Only include similar pixels
          if (colorDiff < threshold) {
              float weight = exp(-dist / radius);
              result += sample * weight;
              totalWeight += weight;
          }
      }
  }

  return result / totalWeight;
}Building Instagram-Style Filters
Real photo filters combine multiple effects in specific orders:
Instagram-Style Vintage Filter
Professional photo filter combining color grading, vignetting, film grain, and lifted blacks
[[ stitchable ]] half4 vintageFilter(
  float2 position,
  SwiftUI::Layer layer,
  float2 size,
  float vignette,
  float grainAmount,
  float fadeAmount
) {
  float2 uv = position / size;
  half4 color = layer.sample(position);

  // 1. Color grading - vintage tone
  half3 shadows = half3(0.1, 0.05, 0.15);  // Blue shadows
  half3 midtones = half3(1.0, 0.95, 0.85); // Warm mids
  half3 highlights = half3(1.0, 0.98, 0.95); // Slight yellow

  float luminance = dot(color.rgb, half3(0.299, 0.587, 0.114));

  half3 graded = mix(shadows, midtones, smoothstep(0.0, 0.5, luminance));
  graded = mix(graded, highlights, smoothstep(0.5, 1.0, luminance));

  color.rgb = mix(color.rgb, graded, 0.7);

  // 2. Reduced contrast
  color.rgb = mix(half3(0.5), color.rgb, 0.85);

  // 3. Vignette
  float2 vignetteUV = uv - 0.5;
  float vignetteIntensity = smoothstep(0.2, 0.8, length(vignetteUV));
  color.rgb *= 1.0 - vignetteIntensity * vignette;

  // 4. Film grain
  float grain = fract(sin(dot(uv * 1000.0, float2(12.9898, 78.233))) * 43758.5453);
  grain = (grain - 0.5) * grainAmount;
  color.rgb += half3(grain);

  // 5. Fade (lifted blacks)
  color.rgb = mix(color.rgb, half3(1.0), fadeAmount * 0.1);

  return color;
}Multi-Pass Effects
Some effects require multiple passes. SwiftUI doesn't support true multi-pass pipelines - You can't feed one shader's output into another. For that we'd need MetalKit solution. MetalKit multi-pass rendering: MetalKit allows creation of intermediate render targets (MTLTexture objects) that act as off-screen canvases. The rendering pipeline works as follows:
- Pass 1: Render to texture A using the bloom extraction shader
- Pass 2: Use texture A as input, apply blur shader, render to texture B
- Pass 3: Combine original texture and texture B using the final composite shader
- Display: Present the final result to screen
Each pass can read from previous passes' outputs, enabling complex effects like bloom, depth of field, or screen-space reflections that require multiple processing stages. We will not cover it in this course.
Here's an example of bloom implementation:
Bloom Extraction (Multi-Pass Demo)
First pass of bloom effect - extracts bright areas with smooth threshold for glowing highlights
// Pass 1: Extract bright areas
[[ stitchable ]] half4 bloomExtract(
  float2 position,
  SwiftUI::Layer layer,
  float2 size,
  float threshold
) {
  half4 color = layer.sample(position);
  float brightness = dot(color.rgb, half3(0.299, 0.587, 0.114));

  if (brightness > threshold) {
      // Soft knee for smooth transition
      float softness = 0.1;
      float knee = threshold - softness;
      float response = smoothstep(knee, threshold + softness, brightness);
      return half4(color.rgb * response, color.a);
  }

  return half4(0.0, 0.0, 0.0, 0.0);
}

// Pass 2: Blur the bright areas (use separable blur)

// Pass 3: Combine with original
[[ stitchable ]] half4 bloomCombine(
  float2 position,
  SwiftUI::Layer original,
  SwiftUI::Layer bloom,
  float2 size,
  float intensity
) {
  half4 originalColor = original.sample(position);
  half4 bloomColor = bloom.sample(position);

  // Additive blending
  half3 result = originalColor.rgb + bloomColor.rgb * intensity;

  // Tone mapping to prevent over-bright
  result = result / (1.0 + result);

  return half4(result, originalColor.a);
}Edge-Aware Filtering
Professional filters preserve edges while smoothing. This is a bilateral filter - an edge-preserving smoothing algorithm that blurs images while maintaining sharp edges. It's commonly used for:
- Noise reduction without losing detail
- Skin smoothing in portrait photography
- Creating a "beauty filter" effect
- Pre-processing for other computer vision tasks
Bilateral Filter (Professional Edge-Aware)
Advanced edge-preserving filter used in professional photo editing - smooths while maintaining sharp edges
[[ stitchable ]] half4 bilateralFilter(
  float2 position,
  SwiftUI::Layer layer,
  float2 size,
  float spatialSigma,
  float intensitySigma
) {
  half4 center = layer.sample(position);
  half4 result = half4(0.0);
  float totalWeight = 0.0;

  // Reduce radius for performance
  int radius = int(min(spatialSigma * 2.0, 10.0));

  // Precompute constants
  float spatialFactor = -0.5 / (spatialSigma * spatialSigma);
  float intensityFactor = -0.5 / (intensitySigma * intensitySigma);

  for (int y = -radius; y <= radius; y++) {
      for (int x = -radius; x <= radius; x++) {
          float2 offset = float2(x, y);

          // Spatial weight (precomputed factor)
          float spatialDist2 = float(x * x + y * y);
          float spatialWeight = exp(spatialDist2 * spatialFactor);

          // Skip negligible weights
          if (spatialWeight < 0.01) continue;

          // Sample neighbor
          half4 sample = layer.sample(position + offset);

          // Intensity weight
          half3 colorDiff = sample.rgb - center.rgb;
          float intensityDist2 = dot(colorDiff, colorDiff);
          float intensityWeight = exp(intensityDist2 * intensityFactor);

          // Combined weight
          float weight = spatialWeight * intensityWeight;

          result += sample * weight;
          totalWeight += weight;
      }
  }

  return result / totalWeight;
}Performance Optimization for Texture Effects
1. Minimize Texture Samples
// EXPENSIVE: 25 samples for 5x5 blur
for (int y = -2; y <= 2; y++) {
    for (int x = -2; x <= 2; x++) {
        // 25 texture reads!
    }
}

// OPTIMIZED: Use linear filtering to get 4 samples for free
// Sample between pixels to get hardware interpolation
float2 texelSize = 1.0 / size;
half4 tl = layer.sample(position + float2(-1.5, -1.5) * texelSize * size);
half4 tr = layer.sample(position + float2( 1.5, -1.5) * texelSize * size);
half4 bl = layer.sample(position + float2(-1.5,  1.5) * texelSize * size);
half4 br = layer.sample(position + float2( 1.5,  1.5) * texelSize * size);
// Each sample is already averaged from 4 pixels!
2. Cache Calculations
// EXPENSIVE: Recalculate for every pixel
float gaussian(float x, float sigma) {
    return exp(-x * x / (2.0 * sigma * sigma));
}

// OPTIMIZED: Pre-calculate weights
const float weights[5] = {0.0625, 0.25, 0.375, 0.25, 0.0625}; // Gaussian approximation
3. Use Texture Coordinates Wisely
// WRONG: Converting back and forth
float2 uv = position / size;
float2 samplePos = uv * size; // Redundant!

// CORRECT: Work in one coordinate system
float2 offset = float2(1.0, 0.0); // In pixels
half4 neighbor = layer.sample(position + offset);
Common Pitfalls
Pitfall 1: Sampling Outside Bounds
// DANGEROUS: Can crash or return garbage
half4 sample = layer.sample(position + float2(1000.0, 1000.0));

// SAFE: Clamp to texture bounds
float2 samplePos = clamp(position + offset, float2(0.0), size);
half4 sample = layer.sample(samplePos);
Pitfall 2: Forgetting Premultiplied Alpha
// WRONG: Color math without considering alpha
half4 result = color1 + color2;

// CORRECT: Handle premultiplied alpha properly
half4 result;
result.rgb = color1.rgb + color2.rgb * (1.0 - color1.a);
result.a = color1.a + color2.a * (1.0 - color1.a);
Pitfall 3: Accumulation Errors
// WRONG: Weights don't sum to 1.0
half4 blurred = sample1 * 0.3 + sample2 * 0.3 + sample3 * 0.3;
// Result is 90% intensity!

// CORRECT: Normalize weights
float totalWeight = 0.3 + 0.3 + 0.3;
half4 blurred = (sample1 * 0.3 + sample2 * 0.3 + sample3 * 0.3) / totalWeight;
The Secret to Professional Effects
The difference between amateur and professional texture effects isn't the algorithm - it's the details:
- Order matters: Color grade → blur → sharpen, not the reverse
- Preserve blacks and whites: Use tone mapping to prevent clipping
- Respect the original: Blend effects, don't replace
- Think in stops: Like photography, adjust in powers of 2
- Profile everything: Texture bandwidth is your bottleneck
Challenges
Challenge 1: Comic Book Effect
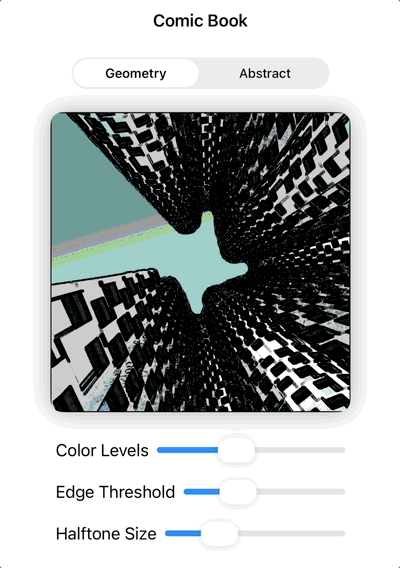
Create a comicBook shader that turns photos into comic-style art using edge detection and posterization.
Requirements:
- Detect edges and make them black lines
- Reduce colors to 4-6 levels (posterization)
- Add simple halftone dots in dark areas
- Keep the effect clean and readable
Challenge 2: Pixelate Transition
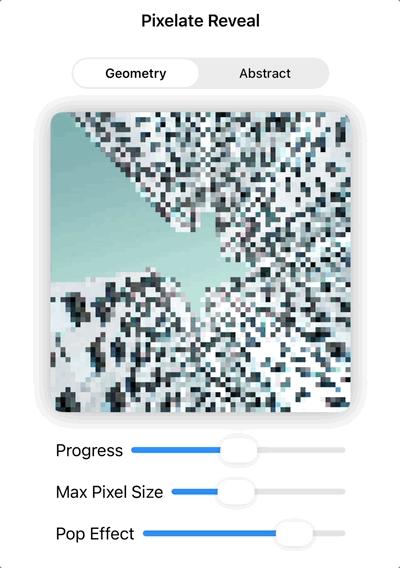
Create a pixelateReveal shader that reveals/hides content by progressively changing pixel size.
Requirements:
- Start with large pixels (heavily pixelated)
- Smoothly transition to normal resolution
- Pixels should "pop in" rather than just shrink
- Work well as a transition effect
Challenge 3: Heat Haze
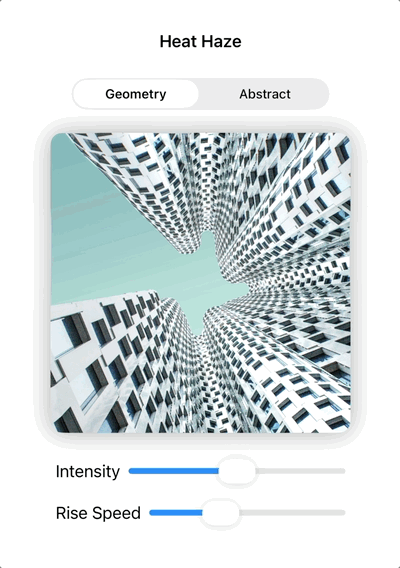
Create a heatHaze shader that simulates the wavy distortion seen above hot surfaces.
Requirements:
- Vertical wavy distortion
- Distortion should animate/flow upward
- Stronger effect at the bottom, fading toward top
- Subtle chromatic aberration for realism
Challenge 4: Cinematic Color Grading
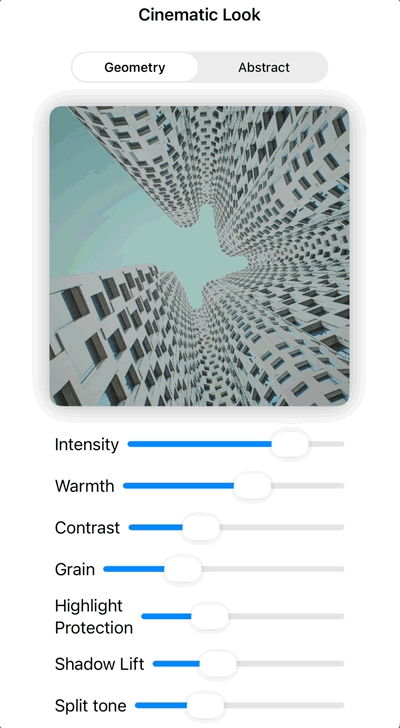
Create a cinematicLook shader that applies modern cinematic color grading popular in films and social media.
Requirements:
- Teal highlights and orange shadows color grading
- S-curve contrast enhancement for more dramatic look
- Highlight roll-off to prevent blown-out whites
- Fine film grain for texture
- Subtle vignette for focus
- Color temperature control for warmth/coolness
Want the Challenges Solutions?
Get the full Xcode project with solutions to all challenges, bonus examples, and clean, runnable code.
Get the Full Project →Validation Questions
Before proceeding to the final chapter:
- What's the difference between linear and nearest neighbor sampling, and when would you use each?
Linear sampling interpolates between nearby pixels, creating smooth results but can blur details. Nearest neighbor picks the exact nearest pixel value, preserving sharp edges but can create pixelated/aliased results. Use linear for smooth effects (blur, scaling), nearest neighbor for pixel art or when exact values matter.
- Why are separable filters more efficient than non-separable ones?
A 2D separable filter can be split into two 1D passes. For example, a 5×5 kernel requires 25 samples, but separating it into 5-sample horizontal + 5-sample vertical passes needs only 10 samples total. Complexity reduces from O(n²) to O(2n).
- How do you handle edge cases when sampling outside texture boundaries?
Use clamping: clamp(samplePos, float2(0.0), textureSize) to stay within bounds. Alternative approaches include wrapping (repeat), mirroring, or extending edge pixels. The choice depends on the visual effect desired.
- What's the importance of normalizing kernel weights in convolution?
If kernel weights don't sum to 1.0, the image brightness changes. Sum > 1.0 brightens the image, sum < 1.0 darkens it. Normalization preserves the original brightness unless you specifically want to modify it (like in sharpening filters).
- How does bilateral filtering preserve edges while smoothing?
It uses two weights: spatial distance (like normal blur) AND color similarity. Pixels are only averaged if they're both spatially close AND similar in color. This smooths within uniform regions but avoids blending across color boundaries (edges).
- Why might you need multiple passes for certain effects?
Some effects require intermediate results that can't be computed in one pass. For example, bloom needs to: extract bright areas → blur them → combine with original. Each step requires the complete result of the previous step, which isn't possible in a single shader pass.
Further Exploration
- Fourier Domain Filtering: Frequency space operations
- Anisotropic Filtering: Direction-aware smoothing
- Temporal Filtering: Using previous frames
- Machine Learning Filters: Neural network-based effects
- HDR Processing: Tone mapping and exposure fusion
Next Chapter Preview: You've mastered texture manipulation and can create professional image effects. But the real world doesn't fit in neat chapters. The final projects will challenge you to combine everything - time, interaction, textures, and mathematics - into experiences that feel magical. Prepare to build the impossible.