Chapter 9: Time-Based Animation
Your Shaders Are Frozen. Let's Make Them Dance.
Look at any modern app or website. The difference between "professional" and "amateur" isn't features - it's motion. Subtle animations that breathe. Colors that pulse gently. Patterns that flow like water.
Here's the secret: Animation is just change over time, and time is just another number. Master how to use that number, and your shaders will come alive.
But here's what's beautiful: Unlike complex physics simulations or mechanical recreations, the most stunning animations are often the simplest. A sine wave. A shifting color. A gentle pulse. These basics, combined creatively, produce magic.
The Time Paradox in SwiftUI and Metal
SwiftUI and Metal shaders live in different temporal realities:
SwiftUI's Time:
- Event-driven (user interactions, animations)
- Managed by the framework
- Can pause, reverse, spring
- Tied to the main thread
Shader Time:
- Continuous flow
- No concept of "events"
- Always moves forward
- Runs at GPU speed (potentially 120Hz on ProMotion)
Your job? Bridge these two worlds without creating temporal chaos.
Mathematical Foundation: Time as a Creative Tool
The Four Fundamental Animation Patterns
Every beautiful animation you've ever seen is built from these four primitives:
// 1. Linear Change - Constant speed movement
float linear(float time, float speed) {
    return time * speed;
}

// 2. Oscillation - Back and forth, the heartbeat of nature
float oscillate(float time, float frequency) {
    return sin(time * frequency * 6.28318);  // frequency in Hz
}

// 3. Pulsing - Sharp attack, slow decay (like a heartbeat)
float pulse(float time, float period) {
    float phase = fract(time / period);
    return pow(phase, 0.1) * (1.0 - phase);
}

// 4. Smooth Random - Organic variation
float smoothRandom(float time) {
    // Using multiple sine waves to create pseudo-random smooth motion
    return sin(time * 0.7) * 0.5 +
           sin(time * 1.3) * 0.3 +
           sin(time * 2.1) * 0.2;
}
Your First Living Shader: Breathing Gradient
Let's start with something simple yet mesmerizing:
Breathing Gradient Animation
A mesmerizing gradient that breathes and flows using sine waves to create organic color transitions
[[ stitchable ]] half4 breathingGradient(
  float2 position,
  half4 color,
  float2 size,
  float time
) {
  float2 uv = position / size;

  // Create a breathing effect using sine waves
  float breathe = sin(time * 2.0) * 0.5 + 0.5;  // 0 to 1, 2 second period

  // Use breathing to modify gradient position
  float gradientPos = uv.y + breathe * 0.2 - 0.1;

  // Create smooth gradient with animated colors
  float3 color1 = float3(0.1, 0.3, 0.8);  // Deep blue
  float3 color2 = float3(0.8, 0.4, 0.6);  // Pink

  // Animate the colors too
  color1.r += sin(time * 1.5) * 0.2;
  color2.g += sin(time * 0.7) * 0.2;

  // Smooth gradient
  float3 gradientColor = mix(color1, color2, smoothstep(0.0, 1.0, gradientPos));

  return half4(gradientColor.r, gradientColor.g, gradientColor.b, 1.0);
}
SwiftUI Integration: The Three Approaches
Approach 1: Timer-Based (Simple but Limited)
struct TimerAnimationView: View {
    @State private var timeValue: Float = 0.0
    let timer = Timer.publish(every: 1/60.0, on: .main, in: .common).autoconnect()

    var body: some View {
        Rectangle()
            .visualEffect { content, proxy in
                content.colorEffect(ShaderLibrary.breathingGradient(
                    .float2(proxy.size),
                    .float(timeValue)
                ))
            }
            .onReceive(timer) { _ in
                timeValue += 1/60.0
            }
    }
}
Pros: Simple, predictable Cons: Can drift, not tied to display refresh
Approach 2: CADisplayLink (Professional)
class DisplayLinkAnimator: ObservableObject {
    @Published var timeValue: Float = 0.0

    private var displayLink: CADisplayLink?
    private var startTime: CFTimeInterval?

    func start() {
        displayLink = CADisplayLink(target: self, selector: #selector(update))
        displayLink?.add(to: .main, forMode: .default)
    }

    func stop() {
        displayLink?.invalidate()
        displayLink = nil
    }

    @objc private func update(_ displayLink: CADisplayLink) {
        if startTime == nil {
            startTime = displayLink.timestamp
        }

        // Calculate elapsed time
        let elapsed = displayLink.timestamp - startTime!
        timeValue = Float(elapsed)
    }
}
Pros: Synced to display, no drift, professional quality Cons: More complex setup
Approach 3: TimelineView (SwiftUI Native)
struct TimelineAnimationView: View {
    var body: some View {
        TimelineView(.animation) { timeline in
            Rectangle()
                .visualEffect { content, proxy in
                    content.colorEffect(ShaderLibrary.breathingGradient(
                        .float2(proxy.size),
                        .float(Float(timeline.date.timeIntervalSinceReferenceDate))
                    ))
                }
        }
    }
}
Pros: SwiftUI native, clean syntax Cons: Less control over timing
Core Animation Techniques
1. Controlled Chaos (The Secret to Loops)
Controlled Chaos Pattern
Harmonic layers creating pleasing interference patterns using 1x, 2x, and 4x base frequencies for organic motion
[[ stitchable ]] half4 controlledChaos(
  float2 position,
  half4 color,
  float2 size,
  float time
) {
  float2 uv = position / size;

  // Three layers with HARMONIC relationships (1x, 2x, 4x)
  // This creates pleasing interference instead of chaos
  float layer1 = sin((uv.x + time * 0.1) * 6.28318);      // Base frequency
  float layer2 = sin((uv.y + time * 0.2) * 6.28318 * 2.0) * 0.5;  // Octave
  float layer3 = sin((uv.x + uv.y + time * 0.4) * 6.28318 * 4.0) * 0.25;  // Two octaves

  // Combine with proper amplitude weighting
  float pattern = layer1 + layer2 + layer3;

  // Normalize to 0-1 range
  pattern = pattern * 0.4 + 0.5;

  // Create sophisticated color mapping
  float3 finalColor = float3(
      pattern * 0.6 + 0.2,
      pattern * 0.4 + 0.3,
      pattern * 0.8 + 0.1
  );

  return half4(finalColor.r, finalColor.g, finalColor.b, 1.0);
}2. Smooth Color Transitions
Smooth Color Flow
Rich color transitions with each RGB channel animated at different frequencies and cross-influence for complex color mixing
[[ stitchable ]] half4 colorFlow(
  float2 position,
  half4 color,
  float2 size,
  float time
) {
  float2 uv = position / size;

  // Create smooth color transitions using sine waves
  // Each color channel has different frequency for rich variation
  float r = sin(time * 0.7 + uv.x * 3.14159) * 0.5 + 0.5;
  float g = sin(time * 1.1 + uv.y * 3.14159) * 0.5 + 0.5;
  float b = sin(time * 1.3 + length(uv - 0.5) * 6.28318) * 0.5 + 0.5;

  // Add some cross-influence for more interesting colors
  r += g * 0.2;
  g += b * 0.2;
  b += r * 0.2;

  // Normalize
  float3 finalColor = normalize(float3(r, g, b)) * 0.8;

  return half4(finalColor.r, finalColor.g, finalColor.b, 1.0);
}3. Morphing Shapes
Organic Morphing Blob
A dynamic blob that morphs using multiple harmonic sine waves and polar coordinates for organic, breathing motion
[[ stitchable ]] half4 morphingBlob(
  float2 position,
  half4 color,
  float2 size,
  float time
) {
  float2 uv = position / size;
  float2 center = uv - 0.5;

  // Create morphing blob using multiple sine waves
  float angle = atan2(center.y, center.x);
  float dist = length(center);

  // Base radius that changes over time
  float radius = 0.3;

  // Add multiple harmonics for organic shape
  radius += sin(angle * 3.0 + time * 2.0) * 0.05;
  radius += sin(angle * 5.0 - time * 3.0) * 0.03;
  radius += sin(angle * 7.0 + time * 1.5) * 0.02;

  // Breathing effect
  radius *= 1.0 + sin(time * 3.0) * 0.1;

  // Create smooth blob
  float blob = 1.0 - smoothstep(radius - 0.02, radius + 0.02, dist);

  // Animated colors
  float3 blobColor = float3(
      0.5 + sin(time * 1.1) * 0.3,
      0.5 + sin(time * 1.7) * 0.3,
      0.8 + sin(time * 2.3) * 0.2
  );

  return half4(blobColor.r * blob, blobColor.g * blob, blobColor.b * blob, blob);
}4. Particle Flow
Flowing Particle System
Animated particles following flowing sine wave paths with varying sizes and rainbow colors based on particle ID
[[ stitchable ]] half4 flowingParticles(
  float2 position,
  half4 color,
  float2 size,
  float time,
  float particleCount  // 10 to 50
) {
  float2 uv = position / size;

  float particles = 0.0;
  float3 particleColor = float3(0.0);

  // Create flowing particles
  for (int i = 0; i < int(particleCount); i++) {
      // Unique flow for each particle
      float id = float(i) / particleCount;

      // Create flowing path using sine waves
      float pathX = sin(time * (0.5 + id) + id * 6.28) * 0.3 + 0.5;
      float pathY = fract(time * (0.3 + id * 0.5) + id);

      float2 particlePos = float2(pathX, pathY);

      // Distance to particle
      float dist = length(uv - particlePos);

      // Particle size varies
      float size = 0.01 + sin(time * 3.0 + id * 6.28) * 0.005;

      // Soft particle
      float particle = 1.0 - smoothstep(0.0, size, dist);

      // Accumulate
      particles += particle;

      // Color based on position
      float3 pColor = float3(
          0.5 + sin(id * 6.28) * 0.5,
          0.5 + sin(id * 6.28 + 2.094) * 0.5,
          0.5 + sin(id * 6.28 + 4.189) * 0.5
      );

      particleColor += pColor * particle;
  }

  return half4(particleColor.r, particleColor.g, particleColor.b, particles);
}Animation Curves and Easing
Understanding Easing Functions
// Linear - robotic, unnatural
float linear(float t) {
    return t;
}

// Ease In - slow start, fast end (falling object)
float easeIn(float t) {
    return t * t;
}

// Ease Out - fast start, slow end (thrown ball slowing down)
float easeOut(float t) {
    return 1.0 - (1.0 - t) * (1.0 - t);
}

// Ease In Out - slow start and end (professional, smooth)
float easeInOut(float t) {
    return t < 0.5
        ? 2.0 * t * t
        : 1.0 - pow(-2.0 * t + 2.0, 2.0) / 2.0;
}

// Bounce - playful, energetic
float bounce(float t) {
    const float n1 = 7.5625;
    const float d1 = 2.75;

    if (t < 1.0 / d1) {
        return n1 * t * t;
    } else if (t < 2.0 / d1) {
        t -= 1.5 / d1;
        return n1 * t * t + 0.75;
    } else if (t < 2.5 / d1) {
        t -= 2.25 / d1;
        return n1 * t * t + 0.9375;
    } else {
        t -= 2.625 / d1;
        return n1 * t * t + 0.984375;
    }
}

// Elastic - springy, dynamic
float elastic(float t) {
    const float c4 = (2.0 * 3.14159) / 3.0;

    return t == 0.0 ? 0.0
         : t == 1.0 ? 1.0
         : pow(2.0, -10.0 * t) * sin((t * 10.0 - 0.75) * c4) + 1.0;
}
Applying Easing to Animations
Easing Functions Demonstration
Interactive showcase of different easing curves (linear, ease-in, ease-out, ease-in-out, bounce, elastic) with animated circle and trail
[[ stitchable ]] half4 easedAnimation(
  float2 position,
  half4 color,
  float2 size,
  float time,
  float easingType  // 0-5 for different curves
) {
  float2 uv = position / size;

  // Create a looping animation phase (0 to 1)
  float phase = fract(time * 0.3);  // ~3 second loop

  // Apply selected easing
  float easedPhase = phase;  // Default linear

  if (easingType < 0.5) {
      easedPhase = phase;  // Linear
  } else if (easingType < 1.5) {
      easedPhase = easeIn(phase);
  } else if (easingType < 2.5) {
      easedPhase = easeOut(phase);
  } else if (easingType < 3.5) {
      easedPhase = easeInOut(phase);
  } else if (easingType < 4.5) {
      easedPhase = bounce(phase);
  } else {
      easedPhase = elastic(phase);
  }

  // Use eased phase to animate something visual
  float2 center = float2(0.5, 0.5);
  float2 animatedPos = mix(
      float2(0.2, 0.5),  // Start position
      float2(0.8, 0.5),  // End position
      easedPhase
  );

  // Draw animated circle
  float dist = length(uv - animatedPos);
  float circle = 1.0 - smoothstep(0.05, 0.06, dist);

  // Trail effect
  float trail = 0.0;
  for (int i = 1; i <= 10; i++) {
      float trailPhase = phase - float(i) * 0.02;
      if (trailPhase < 0.0) trailPhase += 1.0;

      // Apply same easing to trail
      float trailEased = trailPhase;
      if (easingType >= 3.5) {
          trailEased = easeInOut(trailPhase);  // Simplified for trail
      }

      float2 trailPos = mix(float2(0.2, 0.5), float2(0.8, 0.5), trailEased);
      float trailDist = length(uv - trailPos);
      trail += (1.0 - smoothstep(0.04, 0.05, trailDist)) * (1.0 - float(i) / 10.0);
  }

  // Color
  float3 finalColor = float3(trail * 0.3, trail * 0.5, trail * 0.8);
  finalColor += float3(circle);

  return half4(finalColor.r, finalColor.g, finalColor.b, 1.0);
}Performance Considerations
Optimization Strategies
// EXPENSIVE: Complex calculations every frame
float expensiveAnimation(float time) {
    float result = 0.0;
    for (int i = 0; i < 100; i++) {
        result += sin(time * float(i) * 0.1) * cos(time * float(i) * 0.05);
    }
    return result;
}

// OPTIMIZED: Use mathematical identities
float optimizedAnimation(float time) {
    // Sum of sines can often be simplified
    // Or pre-calculate what doesn't change
    float baseFreq = sin(time);
    float harmonics = baseFreq * 0.5 + sin(time * 2.0) * 0.3 + sin(time * 3.0) * 0.2;
    return harmonics;
}

// EXPENSIVE: Recalculating static values
float2 rotatePoint(float2 p, float angle) {
    // Calculating sin/cos every pixel
    return float2(
        p.x * cos(angle) - p.y * sin(angle),
        p.x * sin(angle) + p.y * cos(angle)
    );
}

// OPTIMIZED: Calculate once, reuse
float2 rotatePointOptimized(float2 p, float sinAngle, float cosAngle) {
    // sin/cos passed in, calculated once per frame
    return float2(
        p.x * cosAngle - p.y * sinAngle,
        p.x * sinAngle + p.y * cosAngle
    );
}
Frame Rate Independence
// WRONG: Assumes 60 FPS
float wrongSpeed = position + time * 60.0;  // Speed depends on frame rate!

// CORRECT: Use actual time
float correctSpeed = position + time * speedPerSecond;  // Consistent regardless of FPS
Common Pitfalls
Pitfall 1: Forgetting to Loop
// WRONG: Time keeps growing, eventually breaks
float bigNumber = sin(time * 1000.0);  // Precision loss after hours

// CORRECT: Use modulo or fract for stable loops
float stableLoop = sin(fract(time * 0.1) * 10.0 * 6.28318);
Pitfall 2: Harsh Transitions
// WRONG: Instant change
float jump = step(0.5, fract(time));  // Flickers!

// CORRECT: Smooth transition
float smooth = smoothstep(0.4, 0.6, fract(time));
Pitfall 3: Unsynced Frequencies
// WRONG: Random frequencies create chaos
float chaos = sin(time * 1.234) + sin(time * 5.678);

// CORRECT: Related frequencies create harmony
float harmony = sin(time * 2.0) + sin(time * 4.0) + sin(time * 6.0);
Challenges
Challenge 1: Flowing Aurora
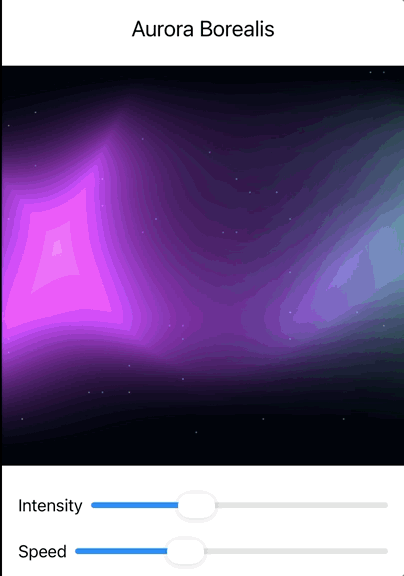
Create an aurora shader that simulates the Northern Lights with flowing, organic movement.
Requirements:
- Use multiple layers of animated gradients
- Colors should shift between green, blue, and purple
- Movement should feel organic and flowing
- Add subtle "curtain" effect
SwiftUI Template:
struct AuroraView: View {
    @State private var timeValue: Float = 0.0
    @State private var intensity: Float = 1.0
    @State private var speed: Float = 1.0

    let timer = Timer.publish(every: 1/60.0, on: .main, in: .common).autoconnect()

    var body: some View {
        VStack {
            Text("Aurora Borealis")
                .font(.title2)
                .padding()

            Rectangle()
                .fill(Color.black)
                .visualEffect { content, proxy in
                    content.colorEffect(ShaderLibrary.aurora(
                        .float2(proxy.size),
                        .float(timeValue),
                        .float(intensity),
                        .float(speed)
                    ))
                }
                .frame(height: 400)

            VStack(spacing: 15) {
                HStack {
                    Text("Intensity")
                    Slider(value: $intensity, in: 0.5...2.0)
                }

                HStack {
                    Text("Speed")
                    Slider(value: $speed, in: 0.5...2.0)
                }
            }
            .padding()
        }
        .onReceive(timer) { _ in
            timeValue += 1/60.0
        }
    }
}
Challenge 2: Ripple Effect
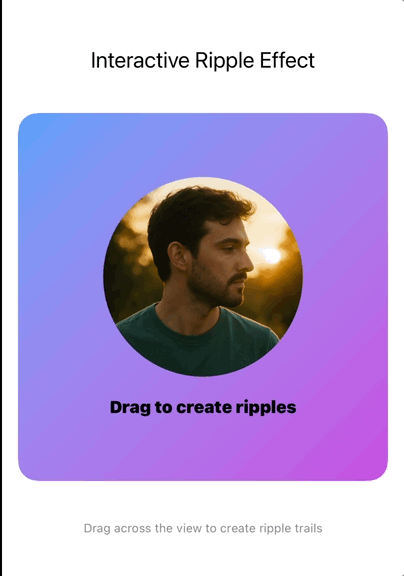
Create a rippleEffect shader that generates expanding ripples from a center point.
Requirements:
- Ripples should expand outward and fade
- Multiple ripples can exist simultaneously
- Add interference when ripples overlap
- Color should vary with ripple age
SwiftUI Template:
struct InteractiveRippleView: View {
    @State private var timeValue: Float = 0.0
    @State private var ripples: [RippleData] = []
    @State private var lastRippleLocation: CGPoint? = nil

    let timer = Timer.publish(every: 1/60.0, on: .main, in: .common).autoconnect()

    var body: some View {
        VStack {
            Text("Interactive Ripple Effect")
                .font(.title2)
                .padding()

            GeometryReader { geometry in
                // Sample content to be distorted
                VStack(spacing: 20) {
                    Circle()
                        .fill(LinearGradient(
                            colors: [.blue, .purple, .pink],
                            startPoint: .topLeading,
                            endPoint: .bottomTrailing
                        ))
                        .frame(width: 100, height: 100)

                    Text("Drag to create ripples")
                        .font(.headline)
                        .foregroundColor(.white)

                    Rectangle()
                        .fill(LinearGradient(
                            colors: [.green, .yellow],
                            startPoint: .leading,
                            endPoint: .trailing
                        ))
                        .frame(height: 50)
                        .cornerRadius(10)
                        .padding(.horizontal)
                }
                .frame(maxWidth: .infinity, maxHeight: .infinity)
                .background(Image(.abstractUnsplash).resizable().opacity(0.4))
                .visualEffect { content, proxy in
                    // Interleave all ripple data into a single array
                    var rippleData: [Float] = []
                    for ripple in ripples {
                        rippleData.append(ripple.x)
                        rippleData.append(ripple.y)
                        rippleData.append(ripple.startTime)
                        rippleData.append(ripple.intensity)
                    }

                    return content.distortionEffect(
                        ShaderLibrary.interactiveRippleDistortion(
                            .float2(proxy.size),
                            .float(timeValue),
                            .floatArray(rippleData)
                        ),
                        maxSampleOffset: .init(width: 50, height: 50)
                    )
                }
                .gesture(
                    DragGesture(minimumDistance: 0)
                        .onChanged { value in
                            // Add ripples during drag with some spacing
                            if let lastLocation = lastRippleLocation {
                                let distance = hypot(
                                    value.location.x - lastLocation.x,
                                    value.location.y - lastLocation.y
                                )
                                // Only add new ripple if we've moved at least 20 points
                                if distance > 20 {
                                    addRipple(at: value.location, in: geometry.size)
                                    lastRippleLocation = value.location
                                }
                            } else {
                                // First ripple in the drag
                                addRipple(at: value.location, in: geometry.size)
                                lastRippleLocation = value.location
                            }
                        }
                        .onEnded { value in
                            // Add final ripple and reset
                            addRipple(at: value.location, in: geometry.size)
                            lastRippleLocation = nil
                        }
                )
            }
            .frame(height: 400)
            .border(Color.gray, width: 1)

            Text("Drag across the view to create ripple trails")
                .font(.caption)
                .foregroundColor(.secondary)
                .padding()
        }
        .onReceive(timer) { _ in
            timeValue += 1/60.0
            cleanupOldRipples()
        }
    }

    private func addRipple(at location: CGPoint, in size: CGSize) {
        let ripple = RippleData(
            x: Float(location.x / size.width),
            y: Float(location.y / size.height),
            startTime: timeValue,
            intensity: Float.random(in: 0.8...1.2)
        )

        ripples.append(ripple)

        // Limit to 15 concurrent ripples for performance (increased from 10)
        if ripples.count > 15 {
            ripples.removeFirst()
        }
    }

    private func cleanupOldRipples() {
        ripples.removeAll { timeValue - $0.startTime > 3.0 }
    }
}

struct RippleData {
    let x: Float
    let y: Float
    let startTime: Float
    let intensity: Float
}
Challenge 3: Particle Vortex
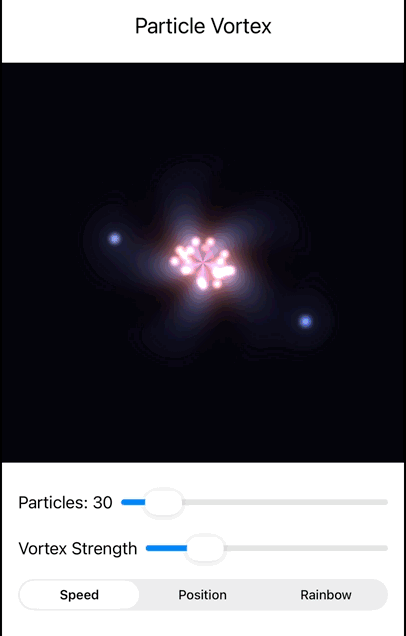
Create a particleVortex shader where particles spiral around a center point.
Requirements:
- Particles should follow spiral paths
- Speed increases closer to center
- Add color variation based on speed/position
- Particles should fade in/out smoothly
SwiftUI Template:
struct ParticleVortexView: View {
    @State private var timeValue: Float = 0.0
    @State private var particleCount: Float = 30.0
    @State private var vortexStrength: Float = 1.0
    @State private var colorMode: Float = 0.0  // 0=speed-based, 1=position-based, 2=rainbow

    let timer = Timer.publish(every: 1/60.0, on: .main, in: .common).autoconnect()

    var body: some View {
        VStack {
            Text("Particle Vortex")
                .font(.title2)
                .padding()

            Rectangle()
                .fill(Color.black)
                .visualEffect { content, proxy in
                    content.colorEffect(ShaderLibrary.particleVortex(
                        .float2(proxy.size),
                        .float(timeValue),
                        .float(particleCount),
                        .float(vortexStrength),
                        .float(colorMode)
                    ))
                }
                .frame(height: 400)

            VStack(spacing: 15) {
                HStack {
                    Text("Particles: \(Int(particleCount))")
                    Slider(value: $particleCount, in: 10...50, step: 1)
                }

                HStack {
                    Text("Vortex Strength")
                    Slider(value: $vortexStrength, in: 0.5...3.0)
                }

                Picker("Color Mode", selection: Binding(
                    get: { Int(colorMode) },
                    set: { colorMode = Float($0) }
                )) {
                    Text("Speed").tag(0)
                    Text("Position").tag(1)
                    Text("Rainbow").tag(2)
                }
                .pickerStyle(SegmentedPickerStyle())
            }
            .padding()
        }
        .onReceive(timer) { _ in
            timeValue += 1/60.0
        }
    }
}
Want the Challenges Solutions?
Get the full Xcode project with solutions to all challenges, bonus examples, and clean, runnable code.
Get the Full Project →Validation Questions
Before proceeding to Chapter 10:
- Why can't we use SwiftUI's built-in animation system directly for shader animations?
SwiftUI animations are designed for view properties (position, opacity, scale), but shaders need continuous time values to calculate mathematical functions like sin(time). SwiftUI can't animate arbitrary shader parameters at 60fps - we need to pass time manually and let the shader compute the animation internally.
- What's the mathematical relationship between frequency, period, and wavelength in shader animations?
Period = 1/frequency. For animations: frequency is cycles per second (Hz), period is seconds per cycle. Wavelength in spatial terms is the distance over which the pattern repeats. Higher frequency = shorter period = more animation cycles in the same time.
- How do you prevent precision loss in long-running animations?
Use fract(time * frequency) to keep time values small and within 0-1 range, or use modulo operations. Avoid directly multiplying large time values by large frequencies, as floating-point precision degrades with very large numbers.
- What's the difference between Timer, CADisplayLink, and TimelineView for shader animation?
Timer: Simple but can drift from display refresh, not perfectly smooth. CADisplayLink: Synced to display refresh rate (60/120Hz), professional quality, no drift. TimelineView: SwiftUI-native, clean API, but less control over timing precision.
- How do harmonic frequencies create more pleasing animations than random frequencies?
Harmonic frequencies (1x, 2x, 4x base frequency) create mathematical relationships that repeat predictably, forming coherent patterns. Random frequencies create chaotic interference with no repetitive structure, appearing jarring rather than organic.
- Why use easing functions instead of linear interpolation for animations?
Linear motion appears robotic and unnatural. Easing functions mimic real-world physics (acceleration/deceleration) and create more pleasing visual transitions. Objects in nature rarely move at constant velocity - they speed up and slow down naturally.
Further Exploration
- Fourier Transforms: Decomposing complex motion into simple frequencies
- Lissajous Curves: Beautiful patterns from combined oscillations
- Perlin Noise Animation: Smooth random motion over time
- Reaction-Diffusion: Complex patterns that evolve over time
Next Chapter Preview: You've mastered time-based animation, making your shaders come alive with organic motion. Chapter 10 introduces Gesture Integration - how to make your living shaders respond to touch, pressure, and multi-finger interactions. You'll learn to create effects that don't just animate, but dance with the user's fingertips.